The Project
The Costa Rica project was a marketing event native mobile application to be run on Android and iOS devices, for the purposes of providing event information, photo sharing, and reward based incentives to event attendees.
The Challenge
Since the function of this application required central data storage there would also have to be a server-side and database as well. The challenge of this project was that it had to be done in less than 6 weeks using 3 resources. That is a database to centrally store information, a server-side application hosting web services, and two different native mobile applications all to be done in less than 6 weeks by only 3 people, with a part-time Q/A person at the very end of the project.
How was this possible?
Using Sencha Touch, our existing client, server, and database frameworks, and our existing build infrastructure and process.
Sencha Touch
Allows you to build a single JavaScript based application, and then compile that application for specific native platforms such as Android and iOS. This means you only have to write an application once in one language, as opposed to have to write it as many times as platforms on which you plan to run.
AppContinuum
For generating client (Sencha Touch), server (Spring RESTful), and database (MS SQL) projects and automatically configuring them to be built on a continuous integration (Jenkins) server, which also handles deployment automation.
HTML5 Robot
A tool for HTML5 test automation, which allows you to drive a web browser like a human being so that you can fully automate the testing of your client application.
Af Gradle
Our core build framework which along with handling server-side compilation, unit testing, integration testing, and database versioning also handles fully automating the process of compiling a Sencha Touch application into native iOS, Android, and Windows mobile applications. For a detailed explanation of the Sencha build process see this.
Amazon Cloud Hosting (EC2)
For applications that need central web services and/or data storage, EC2 provided a scalable way to quickly setup and delivery services. If you need more instances, more memory, more CPUs, or more storage all you have to do is adjust the settings.
TestFlight
A free service for allowing you to automatically upload native iOS and Android applications, where mobile users can with permissions can directly install those applications on their devices for testing purposes.
Target Architecture and Areas of Responsibility
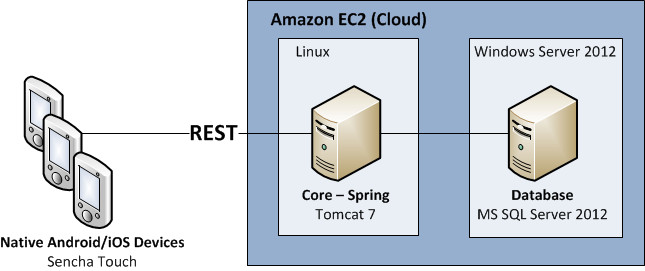
The target architecture was to have the native devices communicate with RESTful web services as hosting on Amazon EC2. The result was that the day to day responsibilities for the team were divided into these areas:
- Client (Sencha Touch) Development
- Server (Java Spring) Development
- Database (MS SQL) Development
- Test Automation
- Build Process
With only three resources, we had to smartly assign the five areas of responsibility:
- Person 1: Client Development, since this is the focus of the system.
- Person 2: Server and Database Development, since the database work was minimal.
- Person 3: Test Automation and Build Process, since there would be no on-team Q/A during the project we would have to use automated tests to keep us honest and stable. The build process would otherwise need to be such that we could easily and automatically deploy everywhere quickly.
TIP: An important point is that integrated Q/A during a project is essential, and that test automation as done by the developers themselves is more of a stopgap than anything else. Independent and unbiased quality assurance is an important part of developing quality software, and the earlier the involvement the better. Test automation is something best used to alleviate the Q/A personnel from doing things which are predictable and trivial, like regression testing, and used to augment the human capabilities. Test automation should be used to augment the tester, not replace them entirely.
Release Management Strategy
We went with the four environment approach based on the following specifics needs:
- Development – This is where developers do their work on their local machines.
- Staging – In order for code to make it to this environment unit and integration test must first pass, which results in the system being fully deployed to the cloud and to TestFlight. Once deployed the test automation suite runs against the fully deployed system using the client application as run in the web browser. The purpose of this environment is automation.
- User Acceptance Testing – In order code to make it to this environment the test automation suite must have passed. The purpose of this environment is to be identical to production for the purposes of human acceptance testing.
- Production – In order for code to make it to this environment a human being must approve the state of the system in UAT. This is the end-user facing environment.
The reason for the different environments is ultimately to prevent deploying broken code to production, while allowing developers to nearly instantly be able to see there changes in a fully deployed environment. Developers and Testers can freely do their jobs without fear of breaking and/or effecting the production environment.
TIP: We use different application icons for each environment. The reason for this is so that it is always obvious what environment the mobile application is from and is talking to. This is something our build process handles by associated the environment name with the icons to use, such as prod-icon-144x144.png being the iPad 144x144 application icon used in the production environment.
The following diagram describes the build process:
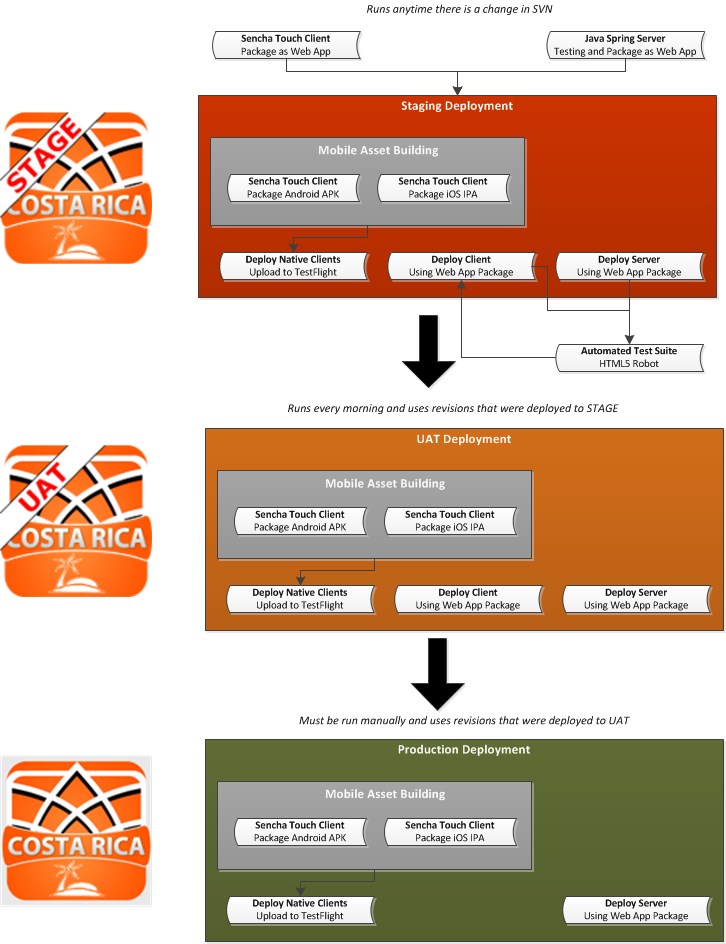
- On change to either the server or client project, the corresponding client or server job is run on the continuous integration server.
- The client job packages the Sencha Touch application as a web application
- The server job runs unit tests, integration tests (which applies database updates if needed), and then packages the application as a web application
-
Deployment to the staging environment is then initiated, which includes:
- Packaging the Sencha Touch Client as a native Android application (in APK format)
- Packaging the Sencha Touch Client as a native iOS application (in IPA format with a single IPA corresponding do each certificate such as Release, Ad Hoc, and/or Enterprise)
- Uploading the native Android and iOS applications to TestFlight
- Deploying the client and server web applications to the application server, which includes database updates if required
- Running the Test Automation Suite against the deployed client application through a web browser
-
Deployment to the UAT environment is run every morning or manually if needed.
- UAT is built according to whatever SCM revisions were deployed to staging
- This is done to prevent deploying broken code to UAT
- UAT consists of the same components as staging, with the exception that the Test Automation is not run here
- The web version of the client is deployed for manually debugging purposes
-
Deployment to the production environment must be initiated manually.
- Production is built according to whatever SCM revisions were deployed to UAT
- This again is done to prevent deploying broken code to production
- Production consists of the same components as UAT, with the exception that the web browser version of the client is not deployed
Working with the Sencha Touch Client
Developing in the Sencha Touch client requires that you follow a set of instructions specific to the Operating System on which you are running and the platforms that you intend on building, for example:
- In order to build a native iOS application you must be running on OS X with Xcode installed
- In order to build a native Android application you can be running on any OS, but you must have the Android Toolkit installed
- In order to build a native Windows 8 application you must be running on Windows 8 and have various Visual Studio tools installed
We have instructions for setting up a Sencha based development environment for each of these Operating Systems, which includes a lot of requirements pre-packaged and configured in order to save development environment setup time.
TIP: The versions of various tools are extremely important for example Android API 19 doesn’t play nice with Cordova 3.0.0, Sencha Command 4 is not backwards compatible with the previous toolsets, Cordova 3.1 and 3.2 have NodeJS compilation issues, Cordova 3.4.0 requires Android API 19 minimum, Windows 8 is only supported by Cordova 3.2 or later, Sencha Command 4 with Cordova 3.4.0 has the wrong location for config.xml, Cordova 3 and later using a very different plugin format than in previous versions, Sencha Command and Cordova require Java 7, etc. See this article for more information: http://www.appfoundation.com/2014/02/automating-the-building-of-native-android-and-ios-apps-using-sencha-touch/
In terms of the development environment, our preference is Eclipse for the following reasons:
- It has a decent JavaScript editor which allows us to ignore framework directories like the one for touch as part of compilation. This saves a lot of time.
- Eclipse comes with integrations for SCM such as SVN, so we can directly work with version control in the IDE.
- Eclipse comes with an Ant plugin which we used to wrap the various calls to Af Gradle to package and test the application in the web browser or natively.
- Eclipse lets us run the Sencha Touch application on a web server out of the IDE, which for running out of a web browser gets you around some security restrictions.
- Eclipse is our Java Spring development environment as well.
- Eclipse is our native Android development environment as well.
On this project development environments were in two categories based on OS:
- Windows 7 – For running out of the Chrome browser and Android natively
- OS X – For running out of the Chrome browser, iOS natively, and Android natively
The way Cordova works for building native applications is by generating native projects containing native source code, which wrap an HTML page containing the Sencha Touch (JavaScript) application in the platform’s native browser. Cordova then compiles the project, giving you a native binary capable of being deployed to the native platform’s Application Store. Note that for iOS in particular, you have to do further work to sign the generated .APP into a specific certificate signed IPA.
TIP: One of the primary reasons for the Sort of Cordova approach was do deal with the fact we had development environments that were incapable of building all of the platforms we needed. Windows 7 cannot build OS X, but if you were to store the iOS and Android generated Cordova configuration in SCM (making it a part of every developer’s environment), whenever you tried to do a build using Sencha through Cordova, Cordova would attempt to build both OS X and Android. While buying everyone a Mac would work for when only dealing with Android and iOS, you would encounter the same situation when dealing with three platforms: Windows 8, iOS, and Android. There is no one OS that can build all three of those.
Depending on the development environment, there are three possible ways to run the client locally:
- As a web browser application
- Requires that you run the application on a web server
- Requires that you open the index.html page on Chrome with the security disabled
- Allows you to instantly view changes to the application
- Does not allow you to test native plugin functionally, such as interacting with the Phone camera
-
As a native Android application
- Requires that you have an Android development environment setup
- Requires that you run the script to generate or refresh the Android project
- Requires that you run the Android project out of Eclipse as an Android Application
- Allows you to run either on an emulator or a connected native device
- Allows you to test and debug in the native environment
- Allows you to use native plugin functionality, such as interacting with the Phone camera
-
As a native iOS application – Requires that you run the script to generate a native iOS project, and then run that project out of Xcode 5.
- Requires that you have an iOS (Xcode) development environment setup
- Requires that you run the script to generate or refresh the Xcode project
- Requires that you run the iOS project out of Xcode
- Allows you to run either on the simulator or a connected native device
- Allows you to test and debug in the native environment
- Allows you to use native plugin functionality, such as interacting with the Phone camera
Another item worth noting is that for native clients that need to work with a web service, you need to put that web service location into the native client itself. In combination with using different icons for the native application depending on the environment, we also use a different configuration file that specifics the various web service endpoints to be used.
![]()
DEV talks to the local development server, STAGE talks the web services in the Staging environment, UAT talks to the web services in the UAT environment, and Production talks to the web services in the Production environment.
Working with the Java Spring Server
The Java Spring environment is fairly straightforward, and something that has been in practice for a very long time. From an Eclipse perspective it is a “Dynamic Web Project” with the various Spring libraries in WebContent/libs, where you then setup Controllers as JSON based RESTful endpoints. Through Af Gradle the dependency management and general build/packaging project as also easily handled. The architecture for this mid-tier is split into the following:

- REST Controller – A RESTful endpoint that accepts JSON input and returns JSON output for the purposes of web services. Also handles authenticating requests through Spring Security.
- Service – The business logic layer that interacts with the Controller through DTOs and DAO layer through mapped Hibernate entities. Dozer is used to easily map domain information into an optimized format that only contains exactly what the particular client call needs for performance purposes.
- DAO – The layer used for direct interaction with the database through Hibernate.
- Database – The layer where data is persistently stored.
The application deployment format is WAR, in which the same WAR is used (in different versions) in each environment. This means that configuration information such as the location and credentials of the database is stored externally on the server. The advantage of doing this is that the same application binary is in every environment with no modifications, so there is no room for human or modification related errors. Something not working correctly that is working in other environments? It is a configuration (or related data) issue.

TIP: An important part of the server-side development process is unit and integration testing. This allows the developer to fully vet created web service endpoints in a realistic environment prior to making them available to the native clients. These tests then ensure that overtime as the application changes the functionality is not broken, resulting in a more stable overall environment. This is especially important during initial development as things are continually changing at a quick pace. Breaking previously working functionality creates additional work, which is unnecessary considering how easy it is to put the appropriate development practices in place.
Working with the MS SQL Database
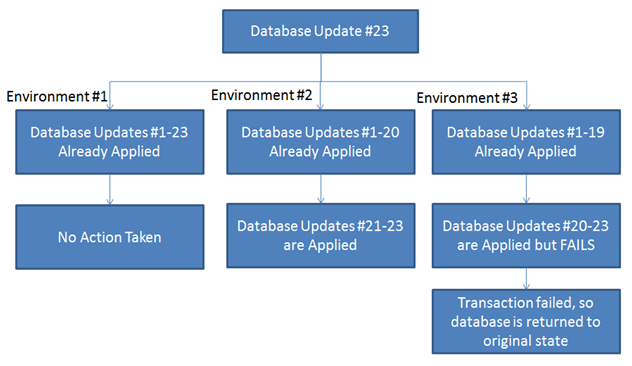
In a real world production database environment you can’t make changes without considering the consequences on the existing data and structure in that environment. Another consideration is how one goes about changing the database, and getting those changes into the various other environments such as the environments of other developers. While just deleting and re-creating the database for developers is an option, this is definitely something you can’t do with a production database. It is also important to test your database update on a production-like database to ensure that is likely to work, while also providing a worst case scenario rollback plan.
Luckily the tool dbdeploy exists, which handles all these issues by allowing you to write incremental scripts containing updates and a rollbacks of those updates. The scripts get applied as needed, in the event of an error that update as done in a transaction is immediately rolled back, and in the event you realize a problem days later the rollback portion of the script can be manually applied. The result is a reliable way of automatically applying database updates that can be done as a part of continuous integration and deployment.
While more abstract tools exist for handling this, dbdeploy is a good pragmatic approach between database administrators and developers.
Working with HTM5 Robot
The difficulty with HTML5 based web application is that they generate a lot of complex HTML and JavaScript, in which current test automation tools do not have a good way to interact. These tools attempt to interact with components using XPath statements that are several hundred characters in length. These XPath statements are not only unreadable to humans; they are also prone to breaking the next time the page is loaded.
HTML5 Robot solves the problems with unreadable and unmaintainable XPath and CSS Selector statements by using a methodology for getting an HTML component, where you simply specify what you want, like a button, and how to find it, like by the text on that button. You then can perform a list of predefined activities with the component once it is located, such as to type text into it, click it, or drag and drop it.
In particular the Gwen Language and the Gwen IDE of HTML5 Robot provide a human-style language means of writing tests to run against a Sencha Touch based application. We used the Gwen IDE to walkthrough the functionality of every screen, and then set these tests to be run after any deployment to the staging environment. The result was a human style regression test run with every code change to the system, in order to ensure that new functionality was not breaking and/or unintentionally affecting existing functionality from and end-user perspective.

Amazon EC2 Performance
We setup the UAT environment to be identical to the Production environment to that we could do an accurate performance test to better gauge how the application would perform in the real world. We started with the overall approach of manually timing from the native mobile client how fast things worked and responded form screen to screen and button press to result.

The result was that while the client-side held most of the time in the overall process, there was a lot of variability in server-side response times.
- Some services like Login vary by as much as 350%.
- This means that on one attempt you may be able to login in .3 seconds, where in another attempt it make take 5 seconds.
- This is an indication of server, network, and or database performance issue due to hardware and/or capacity.
While UAT and Production were Amazon EC2 environments, the Staging environment was a plan in-house Linux server. After some research were able to determine that the average database operation took significantly longer in the UAT environment versus the Staging environment. What was the difference?
- Staging – Windows Server 2012 running MS SQL Server 2012 x64 with 2 cores and 8 GB of RAM
- UAT – Windows Server 2013 running MS SQL Server 2012 on Amazon EC2 T1 Micro, which means variable ECU with 512 MB RAM and a slow network speed
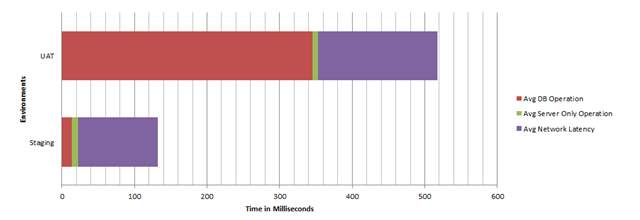
By upgrading the Amazon EC2 Database server to M1 Medium performance was now a lot closer to that of the Staging environment.
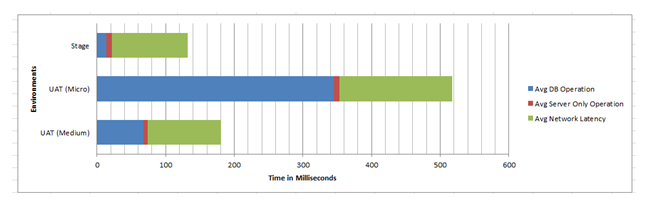
Lesson Learned: The lower tier Amazon EC2 servers are near useless from a performance perspective.