The Project
The Bolleta Project was to create native Android and iOS applications to be run on both phones and tablets, in order to take and print credit card transactions using either the Rambler Reader or the Blue Bamboo combination card reader and bluetooth printer. It would communicate with an existing web services infrastructure.
The Challenge
Having the application run on both phones and tablets requires two distinctly different user interfaces. Needing to run on two different native platforms potentially can be a lot of redundant work if you have to do it in two very different technologies, specifically Java for Android and Objective-C for iOS. There are no existing methods for communicating with the Reambler Reader or the Blue Blamboo, which means plugins are going to have to be written from scratch.
How was this possible?
Using Sencha Touch, Cordova, and our existing build infrastructure and process.
Sencha Touch
Allows you to build a single JavaScript based application, and then compile that application for specific native platforms such as Android and iOS. This means you only have to write an application once in one language, as opposed to have to write it as many times as platforms on which you plan to run.
Cordova
Allows you to build a single JavaScript interface to a native platform and/or connective device, and then provide a platform specific native implementation.
AppContinuum
For generating a client (Sencha Touch) and automatically configuring it to be built on a continuous integration (Jenkins) server, which also handles deployment automation.
HTML5 Robot
A tool for HTML5 test automation, which allows you to drive a web browser like a human being so that you can fully automate the testing of your client application.
Af Gradle
Our core build framework which along with handling server-side compilation, unit testing, integration testing, and database versioning also handles fully automating the process of compiling a Sencha Touch application into native iOS, Android, and Windows mobile applications. For a detailed explanation of the Sencha build process see this.
TestFlight
A free service for allowing you to automatically upload native iOS and Android applications, where mobile users can with permissions can directly install those applications on their devices for testing purposes.
Target Architecture
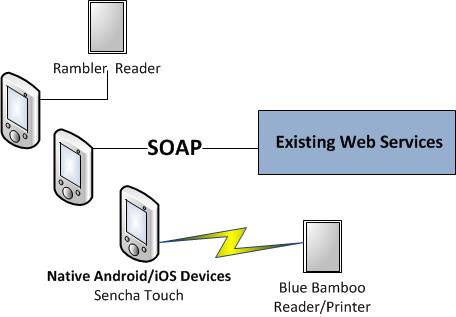
The target architecture was to have the Android and iOS native devices communicate with existing SOAP web services infrastructure. The native devices would then have the option to use either the Rambler Reader to take credit card transactions, or the Blue Bamboo Reader/Printer to take and print credit card transactions over bluetooth.
Release Management Strategy
We went with the three environment approach based on the following specifics needs:
- Development – This is where developers do their work on their local machines.
- Test – In order for code to make it to this environment unit and integration test must first pass, which results in the system being fully deployed to TestFlight. Once deployed the test automation suite runs against the fully deployed system using the client application as run in the web browser. The purpose of this environment is automation.
- Production – In order for code to make it to this environment a human being must approve the state of the system in Test. This is the end-user facing environment.
The reason for the different environments is ultimately to prevent deploying broken code to production, while allowing developers to nearly instantly be able to see there changes in a fully deployed environment. Developers and Testers can freely do their jobs without fear of breaking and/or effecting the production environment.
TIP: We use different application icons for each environment. The reason for this is so that it is always obvious what environment the mobile application is from and is talking to. This is something our build process handles by associated the environment name with the icons to use, such as prod-icon-144x144.png being the iPad 144x144 application icon used in the production environment.
The following diagram describes the build process:
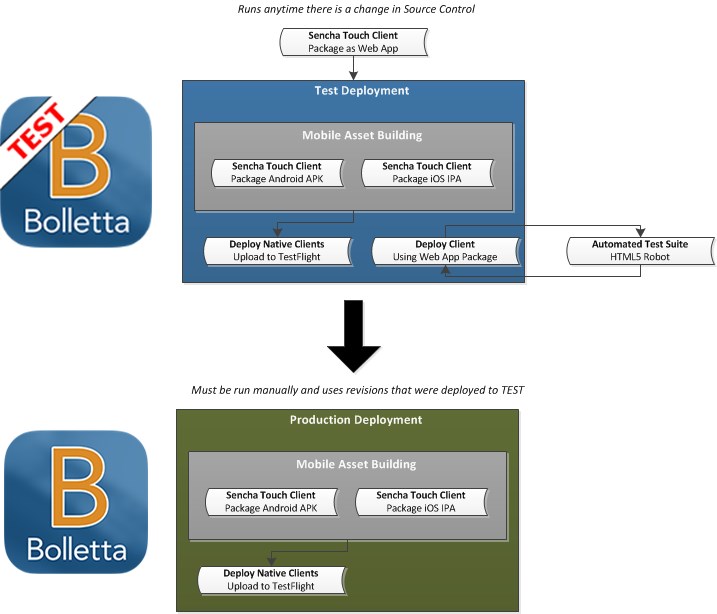
- On change to the client project the corresponding client job is run on the continuous integration server.
- The client job packages the Sencha Touch application as a web application
-
Deployment to the Test environment is then initiated, which includes:
- Packaging the Sencha Touch Client as a native Android application (in APK format)
- Packaging the Sencha Touch Client as a native iOS application (in IPA format with a single IPA corresponding do each certificate such as Release, Ad Hoc, and/or Enterprise)
- Uploading the native Android and iOS applications to TestFlight
- Deploying the client web application to an application server
- Running the Test Automation Suite against the deployed client web application through a web browser
-
Deployment to the Production environment must be initiated manually.
- Production is built according to whatever SCM revisions were deployed to Test
- This again is done to prevent deploying broken code to production
- Production consists of the same components as Test, with the exception that the web browser version of the client is not deployed
Working with the Sencha Touch Client
Developing in the Sencha Touch client requires that you follow a set of instructions specific to the Operating System on which you are running and the platforms that you intend on building, for example:
- In order to build a native iOS application you must be running on OS X with Xcode installed
- In order to build a native Android application you can be running on any OS, but you must have the Android Toolkit installed
- In order to build a native Windows 8 application you must be running on Windows 8 and have various Visual Studio tools installed
We have instructions for setting up a Sencha based development environment for each of these Operating Systems, which includes a lot of requirements pre-packaged and configured in order to save development environment setup time.
TIP: The versions of various tools are extremely important for example Android API 19 doesn’t play nice with Cordova 3.0.0, Sencha Command 4 is not backwards compatible with the previous toolsets, Cordova 3.1 and 3.2 have NodeJS compilation issues, Cordova 3.4.0 requires Android API 19 minimum, Windows 8 is only supported by Cordova 3.2 or later, Sencha Command 4 with Cordova 3.4.0 has the wrong location for config.xml, Cordova 3 and later using a very different plugin format than in previous versions, Sencha Command and Cordova require Java 7, etc. See this article for more information: http://www.appfoundation.com/2014/02/automating-the-building-of-native-android-and-ios-apps-using-sencha-touch/
In terms of the development environment, our preference is Eclipse for the following reasons:
- It has a decent JavaScript editor which allows us to ignore framework directories like the one for touch as part of compilation. This saves a lot of time.
- Eclipse comes with integrations for SCM such as SVN, so we can directly work with version control in the IDE.
- Eclipse comes with an Ant plugin which we used to wrap the various calls to Af Gradle to package and test the application in the web browser or natively.
- Eclipse lets us run the Sencha Touch application on a web server out of the IDE, which for running out of a web browser gets you around some security restrictions.
- Eclipse is our Java Spring development environment as well.
- Eclipse is our native Android development environment as well.
On this project development environments were in two categories based on OS:
- Windows 7 – For running out of the Chrome browser and Android natively
- OS X – For running out of the Chrome browser, iOS natively, and Android natively
The way Cordova works for building native applications is by generating native projects containing native source code, which wrap an HTML page containing the Sencha Touch (JavaScript) application in the platform’s native browser. Cordova then compiles the project, giving you a native binary capable of being deployed to the native platform’s Application Store. Note that for iOS in particular, you have to do further work to sign the generated .APP into a specific certificate signed IPA.
TIP: One of the primary reasons for the Sort of Cordova approach was do deal with the fact we had development environments that were incapable of building all of the platforms we needed. Windows 7 cannot build OS X, but if you were to store the iOS and Android generated Cordova configuration in SCM (making it a part of every developer’s environment), whenever you tried to do a build using Sencha through Cordova, Cordova would attempt to build both OS X and Android. While buying everyone a Mac would work for when only dealing with Android and iOS, you would encounter the same situation when dealing with three platforms: Windows 8, iOS, and Android. There is no one OS that can build all three of those.
Depending on the development environment, there are three possible ways to run the client locally:
- As a web browser application
- Requires that you run the application on a web server
- Requires that you open the index.html page on Chrome with the security disabled
- Allows you to instantly view changes to the application
- Does not allow you to test native plugin functionally, such as interacting with the Phone camera
-
As a native Android application
- Requires that you have an Android development environment setup
- Requires that you run the script to generate or refresh the Android project
- Requires that you run the Android project out of Eclipse as an Android Application
- Allows you to run either on an emulator or a connected native device
- Allows you to test and debug in the native environment
- Allows you to use native plugin functionality, such as interacting with the Phone camera
-
As a native iOS application – Requires that you run the script to generate a native iOS project, and then run that project out of Xcode 5.
- Requires that you have an iOS (Xcode) development environment setup
- Requires that you run the script to generate or refresh the Xcode project
- Requires that you run the iOS project out of Xcode
- Allows you to run either on the simulator or a connected native device
- Allows you to test and debug in the native environment
- Allows you to use native plugin functionality, such as interacting with the Phone camera
Another item worth noting is that for native clients that need to work with a web service, you need to put that web service location into the native client itself. In combination with using different icons for the native application depending on the environment, we also use a different configuration file that specifics the various web service endpoints to be used.
DEV talks to the local development server, TEST talks the web services in the Test environment, and Production talks to the web services in the Production environment.
Working with HTM5 Robot
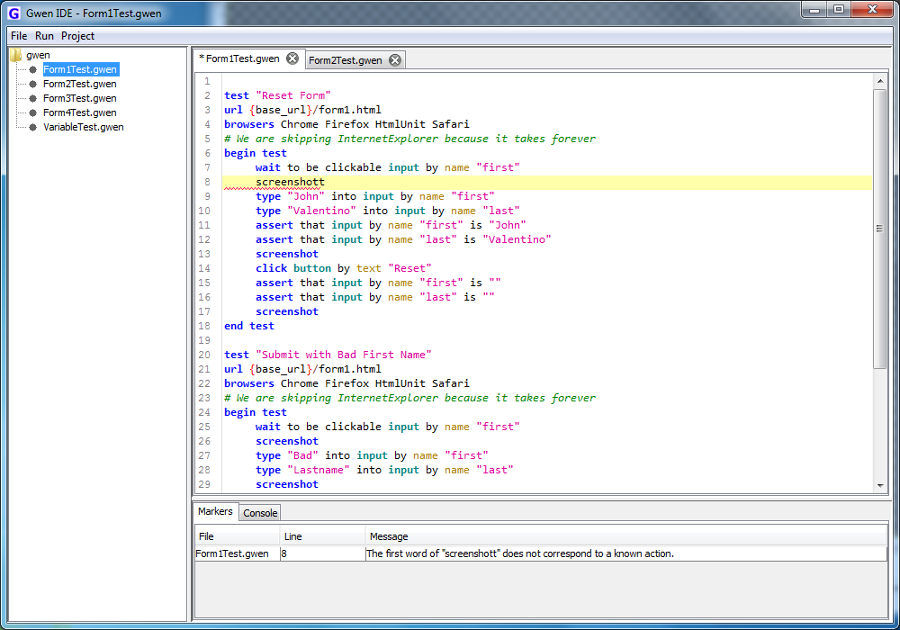
The difficulty with HTML5 based web application is that they generate a lot of complex HTML and JavaScript, in which current test automation tools do not have a good way to interact. These tools attempt to interact with components using XPath statements that are several hundred characters in length. These XPath statements are not only unreadable to humans; they are also prone to breaking the next time the page is loaded.
HTML5 Robot solves the problems with unreadable and unmaintainable XPath and CSS Selector statements by using a methodology for getting an HTML component, where you simply specify what you want, like a button, and how to find it, like by the text on that button. You then can perform a list of predefined activities with the component once it is located, such as to type text into it, click it, or drag and drop it.
In particular the Gwen Language and the Gwen IDE of HTML5 Robot provide a human-style language means of writing tests to run against a Sencha Touch based application. We used the Gwen IDE to walkthrough the functionality of every screen, and then set these tests to be run after any deployment to the staging environment. The result was a human style regression test run with every code change to the system, in order to ensure that new functionality was not breaking and/or unintentionally affecting existing functionality from and end-user perspective.